Create a Cloudflare R2 bucket
Before you can add buckets to Nebbl, you need to create them in the cloud storage provider services. Here are the detailed instructions for the Cloudflare R2 service.
Creating a Cloudflare R2 bucket
Our task is to get 4 credential items for our bucket, which are:
- Account ID
- Bucket name
- Access key ID
- Secret access key
Creating a Cloudflare account and activating the R2 service
Go to https://cloudflare.com and sign up for an account if you haven't already.
After registering and activating the account, head to the R2 section:

Provide your payment method details to activate your R2 service subscription.
R2 subscription comes with a free 10 GB monthly tier, so you won't be charged anything at this step.
Creating a bucket
After you activate your R2 subscription you'll see the Create bucket button on the R2 Overview page. Click it to start bucket creation.

Enter your bucket name. For our purposes we choose nebbl-bucket as the name. This will be the first of our 4 credentials, please note it down. Leave all the other settings unchanged and click the Create bucket button.

Changing bucket settings
After the bucket is created you'll see its page. We need to change some settings for it, so click the Settings tab.

On the bucket Settings tab, scroll down to the CORS Policy section and click the Add CORS policy button.

CORS settings for general buckets
If you don't need zero-knowledge mode, you can go with more narrow CORS policy.
Paste the following snippet in the text field:
[
  {
    "AllowedOrigins": [
      "https://nebbl.com"
    ],
    "AllowedMethods": [
      "GET",
      "PUT"
    ],
    "AllowedHeaders": [
      "Origin",
      "Content-Type",
      "Cache-Control",
      "Pragma",
      "Expires",
      "X-Requested-With",
      "X-Content-Type-Options"
    ],
    "ExposeHeaders": [
      "ETag"
    ]
  }
]
So it would look like this:

Make sure the AllowedOrigins address is exactly https://nebbl.com and doesn't contain a trailing slash (the / symbol after .com). Hit the Save button.
CORS settings for zero-knowledge buckets
If you want to use zero-knowledge mode for your bucket, you need a bit different CORS policy.
Paste the following snippet in the text field:
[
  {
    "AllowedOrigins": [
      "https://nebbl.com"
    ],
    "AllowedMethods": [
      "GET",
      "PUT",
      "DELETE",
      "POST",
      "HEAD"
    ],
    "AllowedHeaders": [
      "Origin",
      "Content-Type",
      "Cache-Control",
      "Pragma",
      "Expires",
      "X-Requested-With",
      "X-Content-Type-Options",
      "Authorization",
      "x-amz-date",
      "x-amz-content-sha256",
      "x-amz-user-agent",
      "Access-Control-Request-Headers",
      "Amz-Sdk-Invocation-Id",
      "Amz-Sdk-Request"
    ],
    "ExposeHeaders": [
      "ETag"
    ]
  }
]
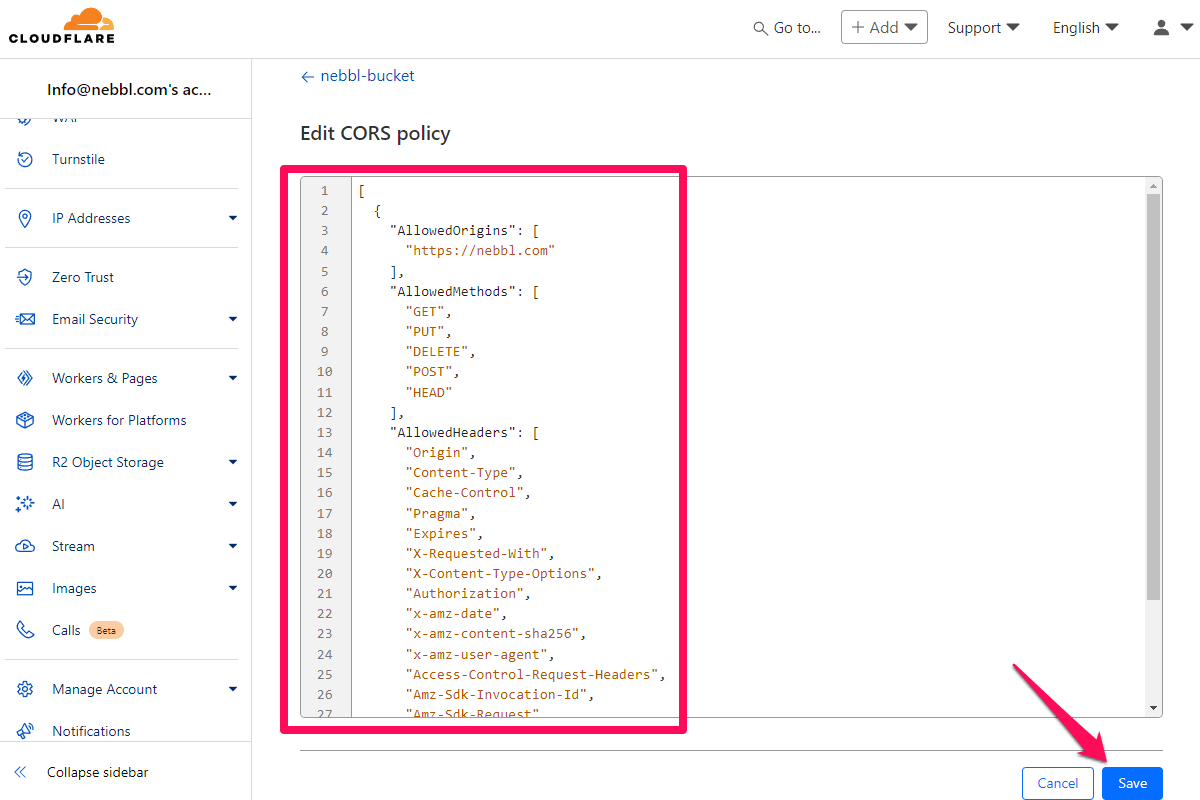
So it would look like this:

Make sure the AllowedOrigins address is exactly https://nebbl.com and doesn't contain a trailing slash (the / symbol after .com). Hit the Save button.
Getting the access credentials
Next, go back to the R2 Overview page:

On the R2 Overview page you will see your Account ID in the top right corner, which is the second of our 4 necessary credentials. Note it down and click the Manage R2 API Tokens link.

You will see an empty page with no tokens created. Click the Create API token button.
The Create API token page will open. Enter the name for the token. In our case we chose nebbl-bucket, the same as the bucket name. In the Permissions section choose Object Read & Write.

Scroll down and in the Specify bucket(s) section choose Apply to specific buckets only and choose our nebbl-bucket from the list.
Leave all other settings at their initial values and click the Create API Token button:

The token detail page will open with the rest of the necessary credentials for us.
The credentials on this final page will be shown only once for security reasons, so be sure to copy them to a safe private place.
Scroll down and note down the Access Key ID and Secret Access Key values, these are the third and fourth credentials from our list. Finally click the Finish button.

Treat your Secret access key as a password. Don't share it anywhere outside of Nebbl or your cloud provider account.
Your Secret access key will be securely encrypted within the Nebbl service and is never transmitted outside of it.
That's all! Now we have all four credentials and we can add this bucket to Nebbl.